Usage
stix2xspec
![]()

![]()
![]()
![]()
![]()


Convert STIX science data (L1A, L1, or L4 spectrograms or pixel data) to a format compatible with XSPEC
Installation
pip install -U stix2xspec
or install with Poetry
poetry add stix2xspec
Then you can run
stix2xspec --help
or with Poetry:
poetry run stix2xspec --help
Dependencies
This software requires the files stored in STIX-CONF. Set up an environment variable that points to this directory.
These files can also be found in the IDL ground software dbase directory.
export STX_CONF=/path/to/STIX-CONF
Example - Background-subtract and convert a STIX FITS file
Try it out in CoLab
Download a FITS file from the STIX Data Center (SDC). More details about STIX data products, along with tutorials, can be found on the STIX wiki. Official science data products are level 1 (L1). These can be found on the STIX archive server.
Pre-release data products (L1A) are supported by this software but not officially recommended for use. There are two types of such data, spectrogram data and pixel data. Spectrogram data have stix-sci-spectrogram in their filename and can be searched for using product_type=’xray-spec’ in stixdcpy FitsQuery. They tend to cover very long time intervals. Pixel data have stix-sci-xray in the filename, and are most often generated for single events (solar flares). Both kinds are returned when searching with product_type=’l1’.
Download the corresponding background file. Background files can be found by using the filter filter=’BKG’ or by looking at the file description on the SDC.
Subtracting the background and converting the file to an OGIP-compatible spectrogram is done via the following:
from stix2xspec.stix2xspec import convert_spectrogram

fitsfile = 'solo_L1A_stix-sci-spectrogram-2207238956_20220723T122007-20220723T182511_079258_V01.fits' # full path
bgfile = 'solo_L1A_stix-sci-xray-l1-2207235029_20220723T113947-20220723T122747_079205_V01.fits'
outfile = convert_spectrogram(fitsfile, bgfile, to_fits = True)
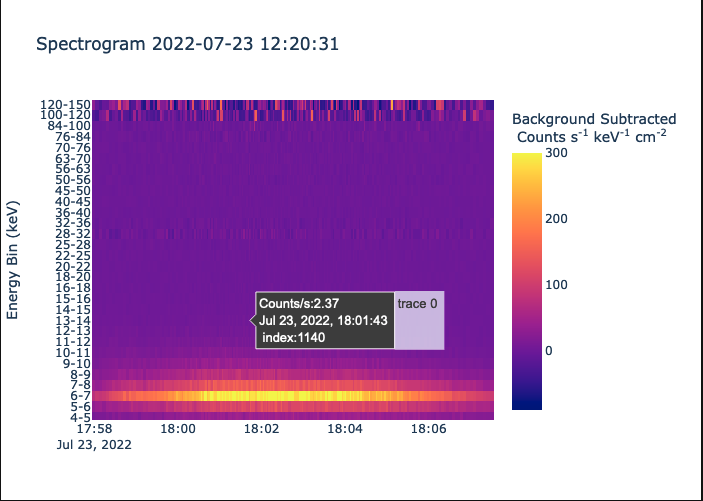
Figure 1: A portion of the converted spectrogram
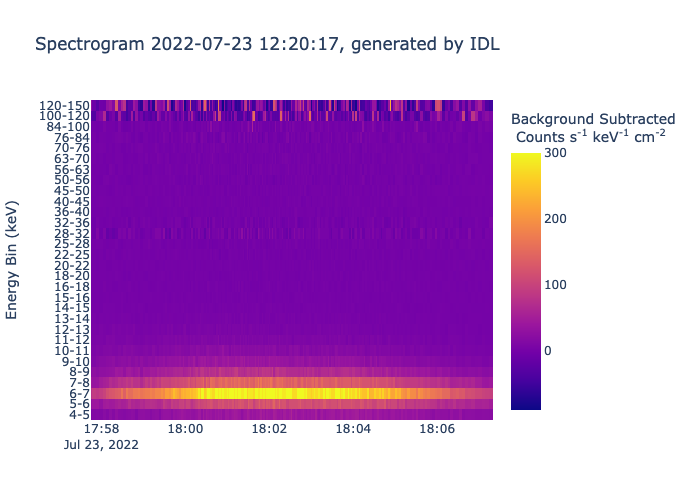
Figure 2: The same portion of the same input and background files, converted using the official IDL STIX ground software (convert_spectrogram.pro)
Along with the important data processing steps of applying the error lookup table (ELUT) and performing livetime-correction, background subtraction is performed, counts are converted to count rate and an energy-dependent systematic error term is generated, which is useful when using XSPEC. Any necessary FITS header quantities are calculated and added to the existing header as needed.
A .srm file containing the spectral response matrix is also written. This is not yet generated via the appropriate calculations; rather, an existing .srm file is edited to match the energy channels contained in the input file. The STIX spectral response matrix is relatively stable over time, but it can be generated using the official IDL ground software.
Example - apply ELUT and livetime correction to spectrogram or pixel data
Data processing can be performed with or without the final step of conversion to count rate.
from stix2xspec.spectrogram import Spectrogram

spec = Spectrogram(fitsfile)
spec.apply_elut()
spec.correct_counts()
Counts can be converted to count rate:
spec.to_rate()
The same can be done for background files:
from stix2xspec.spectrogram import Spectrogram

spec_bg = Spectrogram(bgfile, background = True, use_discriminators = False)
spec_bg.apply_elut()
spec_bg.correct_counts()
Example - fit STIX spectrum with solar-specific models in XSPEC
This requires additional installation of sunpy/sunxspex and of course XSPEC, which comes together with pyxspec. For now, the XSPEC solar models are found in this fork of sunxspex.
Be sure to enable XSPEC via command line before starting a Python session.
. $HEADAS/headas-init.sh
Add the thermal bremsstrahlung model vth and the non-thermal thick-target bremsstrahlung model bremsstrahlung_thick_target to XSPEC, then fit them first individually and then together.
import xspec
from stix2xspec.xspec_utils import *
from sunxspex import xspec_models

mod_th = sunxspex.xspec_models.ThermalModel()
xspec.AllModels.addPyMod(mod_th.model, mod_th.ParInfo, 'add')
mod_th.print_ParInfo() # see the initial configuration of parameters

mod_nt = sunxspex.xspec_models.ThickTargetModel()
xspec.AllModels.addPyMod(mod_nt.model, mod_nt.ParInfo, 'add')
mod_nt.print_ParInfo() # see the initial configuration of parameters

xspec.AllData.clear() # get rid of any data that is still loaded from previous runs
xspec.AllData(f"1:1 {'stx_spectrum_20220723_122031.fits'}{{1140}}") # fit the 1140th data row in the converted spectrogram file. make sure the .srm file is in the same folder as the spectrogram file.

spectime = fits_time_to_datetime('stx_spectrum_20220723_122031.fits', idx=1140)
plot_data(xspec, erange = [4,50],title = f'STIX spectrum at {spectime:%Y-%m-%d %H:%M:%S}').show()

If desired, a time interval rather than a single row (time bin) of the spectrogram can be chosen for fitting. A new FITS file containing only one row must be generated.
spectrum_from_time_interval(stx_spectrum_20220723_122031.fits, '2022-07-23T17:55:00', '2022-07-23T18:05:00', out_fitsname='stx_spectrum_integrated.fits')
Then load this data using the usual pyxspec commands.
Fitting with a thermal and/or non-thermal solar model can easily be done with the following. Other commonly used models native to Xspec are:
apec
powerlaw
bknpower
model, chisq = fit_thermal_nonthermal(xspec, thmodel = 'vth', ntmodel = 'bremsstrahlung_thick_target', lowErange = [3,10])
XSPEC will display fitted model parameters either in the terminal or directly in the Python/Jupyter session, depending on how standard output is configured. You can also print and plot using the following commands (requires pandas and plotLy).
show_model(model, df=True)
Model par |
Model comp |
Component |
Parameter |
Unit |
Value |
Sigma |
|---|---|---|---|---|---|---|
1 |
1 |
vth |
EM |
1e49 |
0.30 |
frozen |
2 |
1 |
vth |
kT |
keV |
1.88 |
± 0.26 |
3 |
1 |
vth |
abund |
1.00 |
frozen |
|
4 |
1 |
vth |
norm |
1.86e-03 |
± 7.77e-04 |
|
5 |
2 |
bremsstrahlung_thick_target |
p |
2.65 |
± 346.01 |
|
6 |
2 |
bremsstrahlung_thick_target |
eebrk |
keV |
16.93 |
± 421.75 |
7 |
2 |
bremsstrahlung_thick_target |
q |
6.64 |
± 71.89 |
|
8 |
2 |
bremsstrahlung_thick_target |
eelow |
keV |
10.43 |
± 176.56 |
9 |
2 |
bremsstrahlung_thick_target |
eehigh |
keV |
1.00e+07 |
± 3.39e+09 |
10 |
2 |
bremsstrahlung_thick_target |
norm |
0.57 |
± 11.83 |
fig = plot_fit(xspec, model, fitrange = [3,30])
fittext = annotate_plot(model, chisq=chisq, exclude_parameters = ['norm','Abundanc','Redshift'], MK=True)
fig.update_layout(width=650, yaxis_range = [-2,3])
fig.add_annotation(x=1.75,y=.5,text=fittext,xref='paper',yref='paper', showarrow = False)
fig.show()

📈 Releases
You can see the list of available releases on the GitHub Releases page.
We follow Semantic Versions specification.
We use Release Drafter. As pull requests are merged, a draft release is kept up-to-date listing the changes, ready to publish when you’re ready. With the categories option, you can categorize pull requests in release notes using labels.
List of labels and corresponding titles
Label |
Title in Releases |
|---|---|
|
🚀 Features |
|
🔧 Fixes & Refactoring |
|
📦 Build System & CI/CD |
|
💥 Breaking Changes |
|
📝 Documentation |
|
⬆️ Dependencies updates |
You can update it in release-drafter.yml.
GitHub creates the bug, enhancement, and documentation labels for you. Dependabot creates the dependencies label. Create the remaining labels on the Issues tab of your GitHub repository, when you need them.
🛡 License
This project is licensed under the terms of the GNU GPL v3.0 license. See LICENSE for more details.
📃 Citation
@misc{stix2xspec,
  author = {stix2xspec},
  title = {Convert STIX science data (L1A, L1, or L4 spectrograms or pixel data) to a format compatible with XSPEC},
  year = {2022},
  publisher = {GitHub},
  journal = {GitHub repository},
  howpublished = {\url{https://github.com/stix2xspec/stix2xspec}}
}
Credits 
This project was generated with python-package-template